
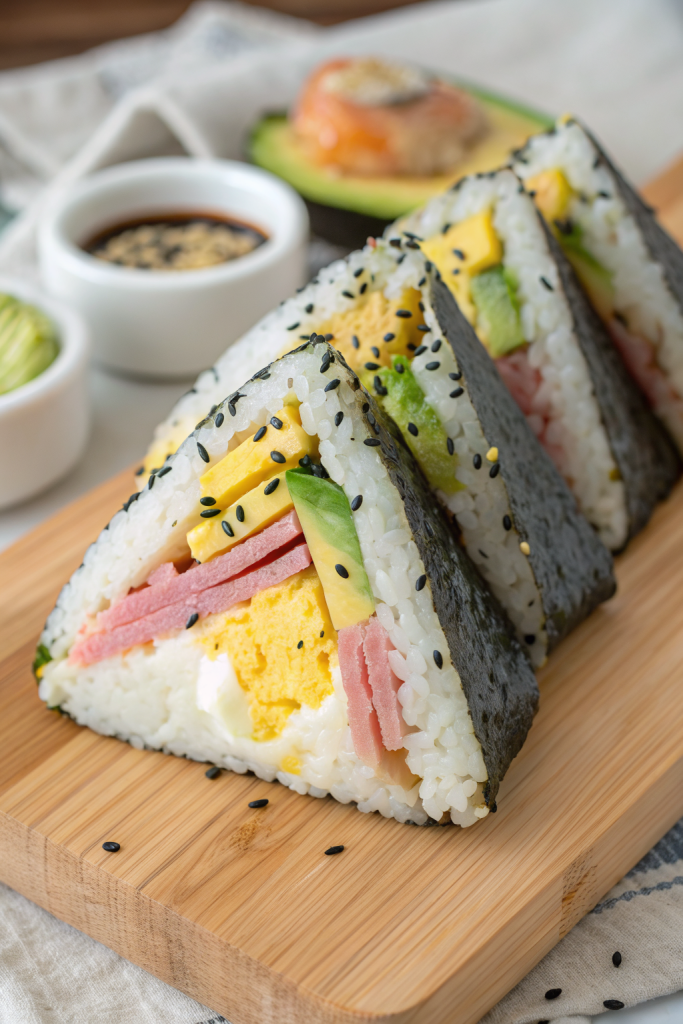
Onigirazu Recipe tastes like the perfect mashup of a sushi roll and a hearty sandwich, with tender rice, savory fillings, and crisp nori in every bite. It works great for busy folks who want a fun, portable meal in about 35–40 minutes from start to finish. I first packed these for a road trip and my friends stopped talking mid-sentence after the first bite, which felt like the highest compliment possible.
Why You Should Try This Onigirazu Recipe
This Onigirazu Recipe gives you all the flavor of sushi without any rolling skills. You stack, fold, slice, and suddenly lunch looks like it came from a trendy Tokyo café.
It fits picky eaters, meal preppers, and anyone who wants a rice-based handheld that travels well. You can customize each one, so one kid gets teriyaki chicken, another gets tuna mayo, and you still get your spicy version.
“This Onigirazu Recipe turned my boring lunch break into the best part of my workday, and my coworkers now hover around my desk at noon. ★★★★★”
Ingredients You’ll Need
Rice
- 2 cups uncooked short-grain Japanese rice
- Use sushi rice or Calrose rice for the right stickiness.
- 2 1/4 cups water for cooking
- 3 tablespoons rice vinegar
- 1 tablespoon sugar
- 1 teaspoon fine sea salt
I suggest Japanese brands like Nishiki or Kokuho Rose when possible, since they cook up sticky and shiny. If you only have medium-grain rice, rinse it very well and use a tiny bit less water so it does not turn mushy.
Nori & Wrapping
- 4 large sheets nori (full-size sushi nori)
- Choose roasted nori labeled “yaki nori” for better flavor and crispness.
- Small bowl of water to moisten your fingers
- Plastic wrap or parchment sheets to help shape and hold the Onigirazu
Protein Filling Options
Pick one or mix and match. The amounts below fill about 4 Onigirazu generously.
Option 1: Teriyaki Chicken
- 2 small chicken thighs or 1 large breast, cooked and sliced
- 2 tablespoons teriyaki sauce (bottled works fine; I like Kikkoman or Soy Vay)
- 1 teaspoon toasted sesame oil
Option 2: Tuna Mayo
- 1 can tuna in water, drained well
- 2 1/2 tablespoons Japanese mayo (Kewpie if you can find it, regular mayo if not)
- 1 teaspoon soy sauce
- 1 teaspoon lemon juice
Option 3: Tamagoyaki-style Egg
- 3 large eggs
- 1 tablespoon milk or water
- 1 teaspoon sugar
- 1/4 teaspoon salt
- 1 teaspoon neutral oil for the pan
You can also use leftover rotisserie chicken, baked tofu, or sliced spam. Season them with soy sauce, a little mirin, or your favorite teriyaki glaze.
Veggies & Extras
- 1 small cucumber, sliced into thin sticks
- 1 small carrot, peeled and cut into matchsticks
- 4 leaves green leaf lettuce or romaine, washed and dried
- 1 small avocado, sliced
- 1–2 tablespoons furikake rice seasoning (sesame and seaweed mix)
- Optional: thinly sliced pickled radish, kimchi, or pickled ginger for extra punch
Use pre-shredded carrots to save time. If you use kimchi or juicy pickles, pat them dry so they do not soak the rice.
Sauces & Seasoning
- Soy sauce or tamari for dipping
- Extra Japanese mayo or spicy mayo (mayo mixed with sriracha)
- Extra toasted sesame seeds
Equipment
- Rice cooker or medium saucepan with lid
- Small bowl for seasoning the rice
- Cutting board
- Sharp knife (a slightly wet blade slices cleaner)
- Nonstick skillet for eggs or chicken
- Plastic wrap or parchment sheets
Tips & Tricks
- Rinse the rice until the water runs almost clear so the grains cook fluffy and not gummy.
- Spread the rice in a thin, even layer so the Onigirazu closes easily and slices neatly.
- Keep your hands slightly damp to prevent rice from sticking to your fingers.
- Place wetter ingredients like avocado or tuna between rice layers, not directly on the nori, to keep the nori from getting soggy too fast.
- Use plastic wrap under the nori so you can wrap everything tightly without frustration.
- Let warm fillings cool to room temperature before assembling so the steam does not soften the nori too quickly.
- Slice with a sharp, slightly wet knife and clean the blade between cuts for those pretty cross-sections.
- Pack Onigirazu tightly in a lunch box so they do not unfold or shift during travel.
How to Make Onigirazu Recipe
Step 1: Cook and Season the Rice
- Rinse the rice under cold water, swishing with your hand, and drain several times until the water looks mostly clear.
- Add the rinsed rice and 2 1/4 cups water to a rice cooker or saucepan. Cook according to your rice cooker instructions or bring to a boil on the stove, then cover and simmer on low until the water absorbs, about 15 minutes.
- While the rice cooks, mix rice vinegar, sugar, and salt in a small bowl until the sugar dissolves.
- Transfer the hot rice to a wide bowl, drizzle the vinegar mixture over it, and gently fold with a rice paddle or spatula until the grains look glossy. Let the rice cool to warm, not hot.
Step 2: Prepare Your Fillings
Teriyaki Chicken
- Slice cooked chicken into thin strips.
- Toss the chicken with teriyaki sauce and sesame oil in a small pan over medium heat until the sauce coats and slightly thickens, about 2–3 minutes.
- Set aside to cool to room temperature.
Tuna Mayo
- Add drained tuna to a bowl and break it up with a fork.
- Stir in Japanese mayo, soy sauce, and lemon juice until creamy.
- Taste and adjust with a little more mayo or soy sauce if you want it richer or saltier, then chill while you prep other items.
Egg Filling
- Beat eggs with milk or water, sugar, and salt in a bowl.
- Heat a nonstick skillet over medium heat and add a little oil.
- Pour in the egg mixture and cook gently, folding or rolling it into a thick omelet shape, then cook until the center sets.
- Transfer to a board and slice into rectangular pieces that fit nicely in the center of your Onigirazu.
Veggies
- Slice cucumber and carrot into thin sticks.
- Wash and dry lettuce leaves and tear them into square-ish pieces.
- Slice avocado just before assembly so it stays fresh and green.
Step 3: Set Up the Wrapping Station
- Place a square of plastic wrap or parchment on your cutting board.
- Lay one sheet of nori on top, shiny side down, with a corner pointing toward you so it looks like a diamond.
- Keep your bowl of warm rice, fillings, and veggies within easy reach, along with a small bowl of water for your fingers.
Step 4: Build the Rice and Filling Layers
- Scoop about 1/2 cup of warm rice into the center of the nori.
- Wet your fingers lightly and press the rice into a small square, about 3–4 inches wide, keeping it slightly thicker in the middle.
- Sprinkle a pinch of furikake over the rice if you like extra flavor.
Step 5: Add Fillings
- Place your protein of choice on top of the rice square: a layer of teriyaki chicken, a scoop of tuna mayo, or a few slices of egg omelet.
- Add veggies on top, such as cucumber sticks, carrot, avocado slices, and a piece of lettuce.
- Drizzle a tiny bit of mayo or spicy mayo over the fillings if you want extra richness, but keep the stack manageable so it still closes.
Step 6: Top with More Rice
- Add another 1/3 to 1/2 cup of rice on top of the fillings.
- Press gently with damp fingers to cover the fillings and form another square that matches the first rice layer.
- Keep the stack centered so the nori folds evenly around it.
Step 7: Fold the Nori
- Take the bottom corner of the nori and fold it up over the rice stack, pressing gently.
- Fold the top corner down over the center, then fold the left and right corners over, like wrapping a present.
- Use the plastic wrap underneath to pull everything tight and wrap the Onigirazu into a snug square.
- Let it sit for 5–10 minutes so the rice softens the nori slightly and everything holds together.
Step 8: Slice and Serve
- Use a sharp knife and wet the blade lightly with water.
- Slice the Onigirazu in half diagonally through the center, cutting through the plastic wrap if you plan to pack them, or unwrap first if you plan to serve on a plate.
- Wipe the knife between cuts so the cross-section stays clean and pretty.
- Serve with soy sauce, extra mayo, or a little dish of furikake on the side.
Step 9: Customize Variations
- Try a breakfast version with egg, bacon, and avocado with lightly salted rice.
- Make a vegetarian Onigirazu with teriyaki tofu, cucumber, carrot, and lots of lettuce.
- Use leftover salmon, shredded beef, or even seasoned ground turkey for a protein-packed lunch.
- Adjust the rice amount to your liking: more rice for a heartier square, less rice for a lighter snack.
What to Serve with Onigirazu Recipe
This Onigirazu Recipe pairs nicely with a simple miso soup or a light veggie soup for a cozy meal. Add a small side salad with sesame dressing or a crunchy cabbage slaw to balance the soft rice. Fresh fruit like orange slices, grapes, or apple wedges rounds out the meal and keeps it refreshing. Kids also love it with edamame, sliced cucumbers, and a little soy sauce on the side for dipping.
Storage Options
- Store leftover Onigirazu tightly wrapped in plastic wrap or in an airtight container in the fridge for up to 24 hours for best texture.
- Keep avocado versions in the fridge for the shorter end of that range, since avocado browns faster.
- Freeze plain rice blocks or unseasoned cooked proteins separately for up to 1 month, then thaw and assemble fresh Onigirazu when needed.
- Reheat chilled Onigirazu by wrapping it loosely in parchment and warming it in a low oven or toaster oven until just slightly warm, or enjoy it straight from the fridge for a bento-style meal.