
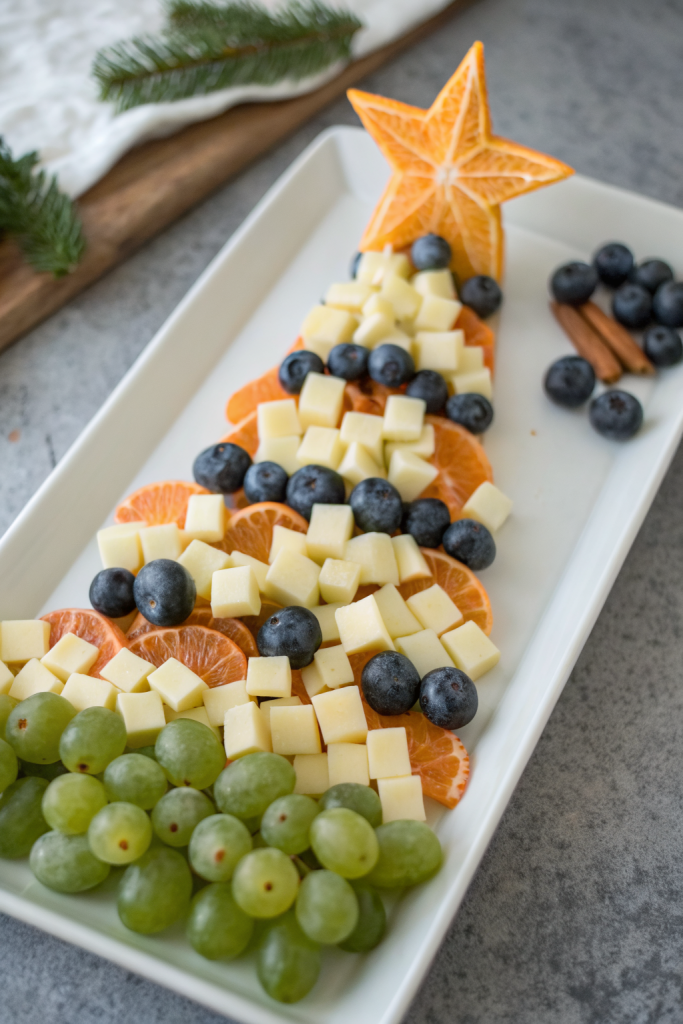
Christmas Tree Shaped Charcuterie Recipe tastes salty, creamy, crunchy, and just a little sweet in every bite, like a holiday party on a platter. It works perfectly for busy hosts who want a showstopper appetizer in about 25 to 30 minutes with zero cooking. I first made this for a neighborhood potluck, and my kids guarded it like security staff at a VIP event.
Why You Should Try This Christmas Tree Shaped Charcuterie Recipe
This Christmas Tree Shaped Charcuterie Recipe turns a basic snack board into a centerpiece that people photograph before they eat. You get layers of flavor from cured meats, cheeses, fruit, nuts, and spreads, all packed into a fun holiday shape.
It fits any crowd size, since you can scale it up or down without extra effort. You also skip the oven, which keeps your kitchen cooler and your stress level lower.
“This Christmas Tree Shaped Charcuterie Recipe stole the whole party and vanished in under 20 minutes, ★★★★★”
Ingredients You’ll Need
You can adjust amounts based on your crowd, but this list covers a medium board that feeds about 8 to 10 snackers.
Cheeses
Try a mix of soft, semi soft, and firm cheeses so every bite feels different.
- 6 to 8 ounces brie or camembert, cut into wedges or small chunks
- 6 ounces sharp cheddar, cut into small cubes
- 6 ounces gouda or smoked gouda, sliced or cubed
- 4 ounces herbed goat cheese, rolled into small logs or left as a mini log
- 4 ounces mozzarella pearls or small fresh mozzarella balls
Notes and swaps:
- Use pre cubed cheese from the deli if you feel short on time.
- Choose at least one kid friendly cheese like mild cheddar or Colby Jack.
- Add a blue cheese wedge if your crowd loves bold flavor.
Cured meats
Fold or roll the meats so they stack nicely into the tree shape.
- 6 ounces salami, sliced (Genoa or hard salami both work)
- 4 ounces prosciutto, thin slices
- 4 ounces pepperoni slices
- 4 ounces soppressata or another favorite cured meat
Notes and swaps:
- Use turkey pepperoni or chicken salami for a lighter option.
- If you avoid pork, pick beef salami and turkey based deli meats.
Crackers, bread, and crunchy elements
- 1 box assorted crackers (buttery, whole grain, and seeded)
- 1 baguette, sliced into thin rounds and lightly toasted
- Breadsticks or pretzel sticks for the “tree trunk” and extra crunch
- Pita chips or flatbread crisps as a backup when crackers run low
Fresh fruit and “ornament” toppings
These add color and sweetness and help the tree look festive.
- 1 cup red grapes, left on small stems if possible
- 1 cup green grapes
- 1 cup strawberries, halved
- 1 cup cherry or grape tomatoes
- 1 to 2 kiwis, peeled and sliced into stars or rounds
- 1 small bunch fresh rosemary, thyme, or parsley for “branches”
- 1 small star fruit or a slice of cheddar cut into a star for the tree topper
Dried fruit, nuts, and extras
- 1/2 cup dried apricots
- 1/2 cup dried cranberries or cherries
- 1/2 cup almonds, roasted and lightly salted
- 1/2 cup pistachios or cashews
- 1/4 cup candied pecans for a sweet crunch
- 1/4 cup pomegranate arils for sparkle
Spreads and dips
- 1/2 cup fig jam or apricot jam
- 1/2 cup honey (hot honey if your crowd likes spice)
- 1/2 cup whole grain mustard or Dijon mustard
- 1/2 cup hummus or herbed cream cheese spread
Use small ramekins or mini bowls so the spreads sit neatly around the tree.
Pantry shortcuts and brand notes
- Use pre sliced cheese and meat from a deli tray if you want to save time.
- Grab a mixed cracker box so you skip buying three separate types.
- Choose a good fig jam like Dalmatia or a store brand that lists figs first.
- Use store bought hummus and flavored goat cheese logs to cut prep.
Equipment list
- Large wooden board, marble slab, or baking sheet (at least 18 inches long)
- Parchment paper, if you use a baking sheet and want easy cleanup
- Small ramekins or mini bowls for dips and spreads
- Small cookie cutter in a star shape for the cheese topper
- Small tongs or toothpicks for serving
- Sharp knife and small cutting board for slicing cheese and fruit
Tips & Tricks
- Sketch a quick triangle on paper so you visualize the tree shape before you start.
- Start from the bottom and build up, so the tree looks balanced and not top heavy.
- Use crackers and bread around the outside of the tree, not inside the triangle, so the shape stays clear.
- Fold salami into little “flowers” by folding slices in half, then in half again, then stacking them.
- Tuck fresh herbs between rows of cheese and meat to mimic evergreen branches.
- Use color in stripes: one row of green grapes, one row of red grapes, one row of tomatoes.
- Place dips in small bowls outside the tree so they do not break the outline.
- Cut cheese into similar sized pieces so the layers stack neatly.
- Add the softest cheeses near the bottom or center so guests reach them easily.
- Keep a backup stash of crackers and fruit in the kitchen so you can refill the board.
- Chill meats and cheeses until the last 20 minutes, then assemble so everything stays fresh.
- Use a lazy Susan or turntable under a round board if you want guests to spin the tree.
- Snap a quick photo before guests arrive, because this board disappears fast.
How to Make Christmas Tree Shaped Charcuterie Recipe
Step 1: Prep the board and ingredients
Place your large board or baking sheet on the counter and line it with parchment if you want easy cleanup. Wash and dry all fruit, then slice strawberries, kiwis, and baguette. Cut cheeses into cubes, slices, or wedges and keep soft cheeses slightly chilled so they hold shape.
Fold salami and other meats into halves or quarters so they stack well. Set out small bowls for jams, honey, mustard, and dips, but keep them off the board for now. Keep everything within reach so you build the tree quickly.
Step 2: Outline the Christmas tree shape
Use a few crackers or nuts to mark a tall triangle in the center of the board. Picture a wide base, a medium middle, and a narrow top, like a classic Christmas tree. Leave space at the bottom for the “trunk” and at the top for the star.
Once you like the outline, remove the temporary markers. You now have a mental guide for where each row of ingredients will sit.
Step 3: Build the base and trunk
Start at the bottom of the triangle with a wide row of cheese cubes or slices. Pack them close so they form a solid line that defines the base. Add a second row just above it with folded salami or pepperoni.
Use breadsticks, pretzel sticks, or stacked crackers to form a short rectangle under the base as the trunk. This small detail turns a random triangle into a clear Christmas tree shape.
Step 4: Add layers of meat and cheese
Work your way up the triangle with alternating rows of cheese and cured meats. Keep each row slightly narrower than the one below it so the tree tapers to a point. Use different colors and textures in each row so the tree looks interesting.
For example, use cheddar cubes, then salami, then mozzarella pearls, then prosciutto ribbons. Tuck small sprigs of rosemary or thyme between rows so the tree looks like it has branches.
Step 5: Add fruit “ornaments” and color pops
Once you fill most of the triangle with meat and cheese, start adding fruit. Cluster grapes in small bunches and tuck them into gaps. Place strawberries and cherry tomatoes in little groups that look like ornaments.
Add dried apricots, cranberries, and pomegranate arils in small pockets of color. Keep the tree outline clear, so avoid piling fruit outside the triangle shape.
Step 6: Fill gaps with nuts and herbs
Look for any empty spots inside the tree and fill them with nuts and dried fruit. Use almonds, pistachios, and candied pecans to add crunch and richness. Sprinkle pomegranate arils in a few spots for sparkle.
Tuck extra rosemary or parsley around the edges of the tree. The green herbs give the whole board a fresh, pine like look and a nice aroma.
Step 7: Add the star and finishing touches
Cut a slice of cheddar or another firm cheese with a small star cookie cutter. Place the star at the top point of the tree. If you use star fruit, slice it and pick the prettiest piece for the topper.
Set small bowls of fig jam, honey, mustard, hummus, or herbed cream cheese around the outside of the tree. Add crackers, baguette slices, and breadsticks around the edges of the board so guests can reach them easily. Step back and adjust any crooked rows or gaps until the Christmas Tree Shaped Charcuterie Recipe looks balanced.
Step 8: Chill briefly and serve
If your kitchen feels warm, slide the whole board into the fridge for 10 to 15 minutes. This quick chill helps the cheese and meats hold shape. Pull the board out about 10 minutes before serving so flavors soften and bloom.
Set out small tongs or toothpicks so guests can grab pieces without touching everything. Watch the tree shrink as people snack, then refill with extra crackers and fruit from your backup stash.
What to Serve with Christmas Tree Shaped Charcuterie Recipe
Serve this Christmas Tree Shaped Charcuterie Recipe with a big platter of fresh veggies and a simple ranch or yogurt dip to balance the richness. Add a bowl of olives and pickles for salty, tangy bites that cut through the cheese and meat. Offer sparkling water, flavored seltzers, hot cocoa, or spiced apple cider as drinks that fit the holiday vibe.
You can also set out a small dessert tray with cookies, chocolate bark, or peppermint candies nearby. Guests move naturally from savory tree to sweet treats, and your snack table feels complete.
Storage Options
- Wrap leftover sections of the tree tightly with plastic wrap and store the entire board in the fridge for up to 2 days.
- Transfer meats and cheeses to airtight containers if you want to keep them fresh for 3 to 4 days.
- Keep crackers and bread separate at room temperature in sealed bags so they stay crisp.
- Avoid freezing the full Christmas Tree Shaped Charcuterie Recipe, since freezing changes the texture of most cheeses and fruits.
- If you must freeze, freeze only hard cheeses and some cured meats in airtight bags for up to 1 month, then thaw in the fridge and serve in a fresh layout, not as the original tree.