
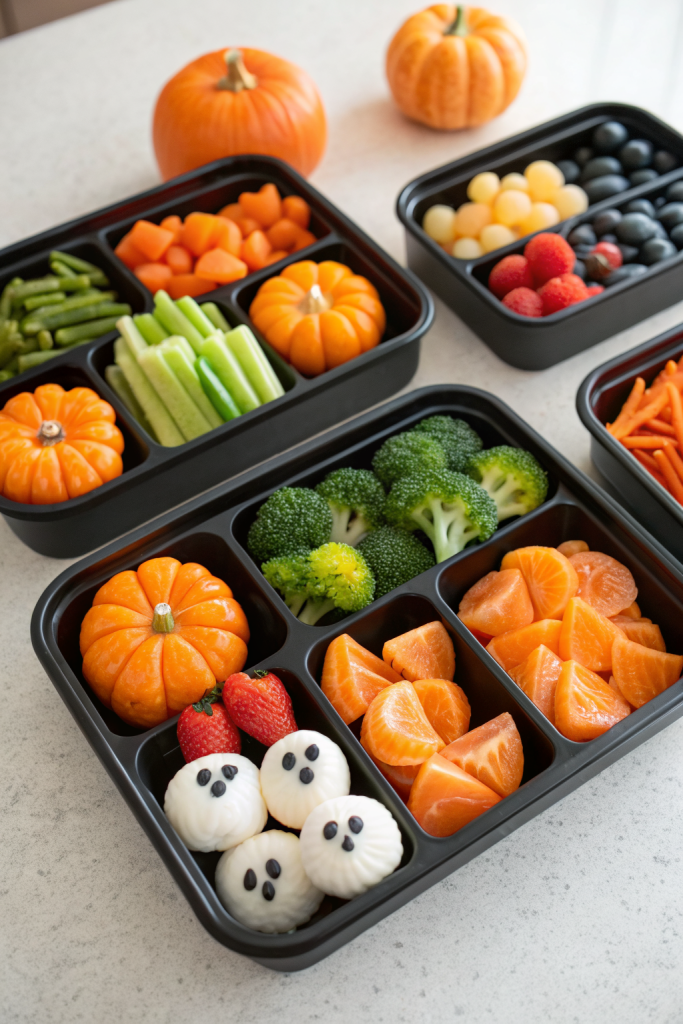
Halloween Fruit and Veggie Tray Idea makes a spooky, crunchy, juicy snack board that tastes fresh, a little sweet, and totally fun to eat. It works perfectly for busy parents, party hosts, or teachers who want a 30-minute, kid-friendly Halloween snack that still feels festive and colorful. I tested this one on my own nieces and nephews, and they attacked the veggie skeleton before the candy bowl, which felt like a small holiday miracle.
Why Make This Halloween Fruit and Veggie Tray Idea at Home
You control the sugar, the colors, and the quality when you build this tray yourself. Store-bought party platters cost more, use fewer colors, and rarely look as cute as something you arrange with a little intention.
You also tailor everything to allergies and picky eaters. Kids feel more excited about produce when it looks like pumpkins, ghosts, and monsters instead of “just carrots.”
“This Halloween Fruit and Veggie Tray Idea disappeared faster than the candy bowl and even the adults kept going back for ‘just one more grape eyeball’ ★★★★★”
Ingredients You Need
You can mix and match produce, but this combo gives you a bright, Halloween-style color palette and fun shapes.
Vegetables
- Baby carrots
- Whole carrots (for carving pumpkin mouths or skeleton limbs)
- Cucumber slices (rounds and strips)
- Celery sticks
- Cherry or grape tomatoes
- Mini bell peppers (orange, yellow, red look most festive)
- Broccoli florets
- Cauliflower florets
- Sugar snap peas or green beans
Fruit
- Green grapes
- Red or black grapes
- Strawberries
- Blueberries
- Mandarin oranges or clementines (they look like tiny pumpkins)
- Apple slices (use Honeycrisp or Gala for sweetness)
- Kiwi slices or wedges
- Banana slices (for quick ghost faces)
“Face” Details & Fun Extras
- Mini chocolate chips (for eyes on banana ghosts, apple monsters)
- Dark chocolate chips or candy eyeballs
- Raisins or dried cranberries
- Pretzel sticks (for skeleton arms or broom handles)
- String cheese sticks (slice into bones or ghost shapes)
- Hummus (plain or roasted red pepper)
- Ranch dip or Greek yogurt dip
- Peanut butter or almond butter (for apple monster mouths; use sunflower seed butter for nut-free)
Pantry Shortcuts & Brand Notes
- Use pre-cut veggie trays from the store and rearrange them into Halloween shapes to save time.
- Buy pre-washed salad mix and use the leafy greens as a background “graveyard grass.”
- Choose shelf-stable hummus cups or ranch cups if you need to pack this for school or a potluck.
- Candy eyeballs from Wilton or store brands work great and hold up better than chocolate in warm rooms.
Equipment
- 1 large platter, sheet pan, or cutting board (a black tray looks extra spooky)
- Small bowls or ramekins for dips and tiny items
- Sharp knife and small paring knife
- Cutting board
- Small cookie cutters (pumpkin, bat, ghost) if you have them
- Paper towels (to pat fruit dry so it does not slide around)
Tips & Mistakes
- Arrange everything on the tray where you want it before you fill in gaps, so you avoid constant rearranging.
- Pat fruit and veggies dry so dips and eyeballs stick instead of sliding off.
- Keep colors grouped in clusters so the tray looks bold and not muddy.
- Use firm fruit like grapes and apples for eyeballs and faces; soft fruit turns mushy and loses shape.
- Avoid strong-smelling veggies like raw onion that can overpower the fruit.
- Add dips in small bowls, not straight on the tray, so they do not run into the produce.
- Keep toothpicks away from very young kids and use pretzel sticks instead for safety.
- Slice apples last and toss them lightly with lemon juice so they stay bright and not brown.
- Do a quick test fit of your “main character” shape, like a skeleton or pumpkin, before you cut too many pieces.
- Chill the tray before serving, but cover it tightly so the fridge does not dry out the produce.
How to Make Halloween Fruit and Veggie Tray Idea
Step 1: Plan Your Spooky Layout
Decide on one main design so the tray looks intentional. Popular options include a veggie skeleton, a jack-o-lantern face, a graveyard scene, or a monster face. Sketch a quick layout on paper if that helps you visualize where each color goes.
Step 2: Wash, Dry, and Prep Produce
Rinse all fruits and veggies under cool water. Dry everything very well with clean towels or paper towels so the pieces stay crisp and do not slip around. Trim stems, peel carrots if needed, and cut larger veggies into bite-size pieces.
Slice cucumbers into rounds for eyes and into long strips for borders or bones. Cut mini peppers in half and remove seeds so they look like little pumpkin shells. Slice apples and toss them lightly with lemon juice to slow browning.
Step 3: Build a Veggie Skeleton or Jack-o-Lantern
If you choose a skeleton, use a small bowl of hummus or ranch as the “head” at the top of the tray. Arrange cucumber slices or string cheese pieces around it to shape the skull and teeth. Use baby carrots or celery sticks for arms and legs, and stack cauliflower or broccoli to form ribs and hips.
If you choose a jack-o-lantern, outline a big pumpkin shape with baby carrots or orange pepper strips. Fill the inside with more orange veggies, then use cucumber slices, olives, or grapes to form eyes, nose, and a jagged mouth. Add a celery stick or green pepper at the top for the stem.
Step 4: Add Fruit Monsters and Ghosts
Make banana ghosts by slicing bananas into chunks and pressing mini chocolate chips in as eyes and mouths. Build apple monsters by slicing apples into wedges, spreading a little nut or seed butter inside, and sticking in a few raisins or sunflower seeds as “teeth.” Add a strawberry slice tongue if you feel dramatic.
Use grapes and blueberries to build eyeballs. Place a grape slice on a cucumber round, then press a blueberry or chocolate chip in the center. Scatter these eyeballs around the tray so it looks like something watches from every corner.
Step 5: Fill Gaps With Color and Crunch
Tuck broccoli, cauliflower, and snap peas into any open spots to create a full tray. Group similar colors together so each section looks bold and intentional. Place mandarin orange segments in a cluster to mimic a pumpkin patch, and drop a small piece of celery in the center of each to finish the look.
Add pretzel sticks near the veggies as “broom handles” or “bones.” Keep dips in small bowls and nestle them into corners or near the skeleton head. Sprinkle a few candy eyeballs or raisins around the edges for extra Halloween detail.
Step 6: Chill and Hold Until Party Time
Cover the finished tray tightly with plastic wrap. Chill it in the fridge for up to a few hours before serving so everything stays crisp and fresh. Pull it out about 10 to 15 minutes before guests arrive so the dips soften slightly and taste better.
Variations I've Tried
I built a full “graveyard” tray with a bed of leafy greens, broccoli “trees,” cauliflower “fog,” and bell pepper “gravestones,” and the kids loved hunting for hidden grape eyeballs. I also tried a full fruit-only version for a classroom party with banana ghosts, clementine pumpkins, kiwi bats, and a big grape spider in the center. Another favorite uses mostly veggies with just a few fruit accents, which works well for adults who want a lighter snack before pizza or chili.
You can also go mini and build individual Halloween snack cups with a little hummus at the bottom and veggie sticks standing up like a spooky bouquet. If you host a crowd with allergies, you can skip nuts, use seed butter, and stick to simple ranch and hummus dips. I often keep cheese on a separate small plate so dairy-free guests still enjoy the main tray.
How to Serve Halloween Fruit and Veggie Tray Idea
Set the tray in the center of the table and keep small plates and napkins nearby so people can build their own little snack piles. Offer at least two dips, such as ranch and hummus, and label them if you have guests with dietary needs. Pair the tray with simple kid-friendly drinks like water, sparkling water, apple cider, or juice boxes.
If you host a bigger party, place a second smaller tray on another table so guests do not crowd in one spot. Refill the tray with extra fruit and veggies from the fridge as it empties so it stays bright and inviting.
How to store
- Cover leftovers tightly with plastic wrap or transfer them to airtight containers, then store in the fridge for up to 2 days.
- Keep dips in separate containers in the fridge for 3 to 4 days, and stir them before serving again.
- Avoid freezing fresh fruit and veggies from this tray, since freezing changes the texture and makes them watery.
- Refresh slightly dried veggies by soaking them in cold water for 5 to 10 minutes, then pat dry before serving.