
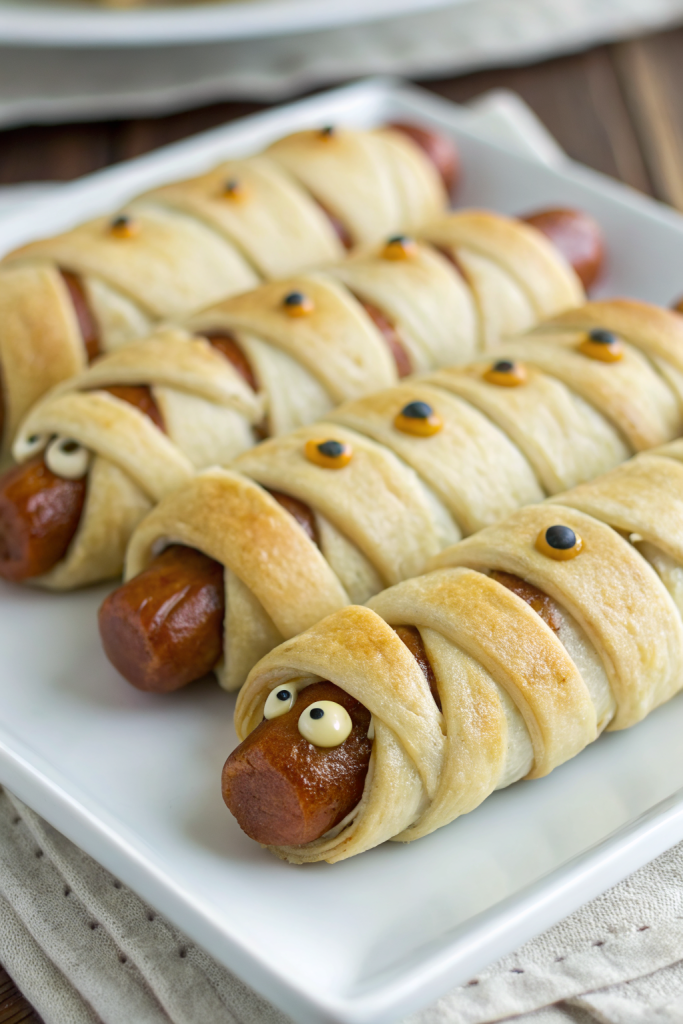
Halloween Snacks for Kids Parties taste sweet, salty, and just spooky enough to thrill kids without giving them nightmares, and they come together in about 60 to 90 minutes total if you prep a few things at once. They work perfectly for parents, teachers, and party hosts who want fun Halloween party food that kids actually eat instead of just poking with a plastic fork. I tested these with my own nieces, who are brutally honest food critics, and they went back for seconds and thirds.
Why Make This Halloween Snacks for Kids Parties at Home
Homemade Halloween Snacks for Kids Parties let you control sugar, food dyes, and allergens while still keeping everything cute and fun. You skip the mystery ingredients and use what your kids already like, which saves money and drama at the snack table.
You also customize everything to your theme, from not-too-scary preschool parties to slightly creepy tweens who want extra fake blood. Kids love helping assemble these snacks, so you turn party prep into an activity instead of a solo kitchen sprint.
“These Halloween Snacks for Kids Parties disappeared faster than the candy bowl, and the kids asked for the recipes to send home to their parents.” ★★★★★
Ingredients You Need
I break this into a simple menu so you pick and choose what fits your party. You do not need every single item, but mixing sweet and savory snacks keeps kids happy and parents grateful.
1. Mummy Hot Dogs
- Hot dogs or mini sausages
- Refrigerated crescent roll dough or pizza dough
- Sliced cheese (optional, for cheesy mummies)
- Mustard or ketchup for eyes
- Cooking spray or parchment paper
Notes and swaps:
Use turkey or chicken hot dogs if you want a lighter option. Gluten free crescent dough works fine, just handle it gently. If kids hate mustard, use ketchup or a tiny dot of mayo for the eyes.
2. Monster Apple Bites
- Apples, sliced into thick wedges
- Peanut butter or sunflower seed butter
- Mini marshmallows
- Strawberry slices or red apple peel strips for tongues
- Mini chocolate chips or candy eyes
Notes and swaps:
Use sunflower seed butter for nut free schools. Store sliced apples in water with a splash of lemon juice to slow browning. Candy eyes look cute, but mini chocolate chips pressed into marshmallows work just as well.
3. Ghost Banana Pops
- Bananas, cut in half
- White chocolate chips or vanilla candy melts
- Coconut oil (small spoonful to thin chocolate)
- Mini chocolate chips for eyes and mouth
- Lollipop sticks or popsicle sticks
Notes and swaps:
Use dairy free white chips if needed. Candy melts coat more smoothly than regular chocolate and handle room temp better. If you skip sticks, serve them as “ghost bites” on a tray.
4. Spooky Popcorn Mix
- Plain popcorn (air popped or lightly salted bagged popcorn)
- Pretzel sticks
- Mini chocolate candies or chocolate chips
- Candy corn or candy pumpkins
- Melted white chocolate or colored candy melts
- Halloween sprinkles
Notes and swaps:
Use store bought plain popcorn to save time. Choose dye free candies if kids have sensitivities. Skip nuts unless you know every child can eat them safely.
5. Veggie Jack O’Lantern Cups
- Clear plastic cups
- Baby carrots, cucumber sticks, bell pepper strips
- Ranch dip, hummus, or yogurt based dip
- Black food safe marker to draw faces on cups
Notes and swaps:
Use store bought ranch or hummus to keep this easy. Draw faces on cups a day ahead so you only fill them on party day. Add snap peas or cherry tomatoes if your kids like them.
6. Spider Web Pizza Bagels
- Mini bagels, sliced
- Pizza sauce
- Shredded mozzarella cheese
- Black olives, sliced into “spiders”
Notes and swaps:
Use whole wheat bagels for extra fiber. Dairy free cheese shreds work, but melt them under a broiler for better texture. Skip olives for picky eaters and use tiny pepperoni “spiders” instead.
7. Equipment List
- Baking sheets
- Parchment paper or silicone baking mats
- Microwave safe bowls for melting chocolate
- Small offset spatula or spoon for spreading
- Sharp knife and cutting board
- Lollipop sticks or popsicle sticks
- Mixing bowls
- Clear plastic cups
- Food safe marker
Tips & Mistakes
- Plan 3 to 5 different Halloween Snacks for Kids Parties instead of ten, so you keep prep realistic and still offer variety.
- Keep at least one snack nut free, one gluten free, and one mostly fruit or veggie based, so every kid finds something safe and familiar.
- Dry hot dogs and apple slices with paper towels before wrapping or decorating, so dough and toppings stick well.
- Avoid overbaking mummy hot dogs, since dry hot dogs taste rubbery and kids notice.
- Melt chocolate in short bursts in the microwave and stir often, so it stays smooth and does not scorch.
- Assemble banana ghosts close to party time, since bananas brown if they sit too long.
- Label snacks with simple cards like “contains dairy” or “nut free” so parents relax and kids know what they can eat.
- Keep decorations fun but not too gory for younger kids, since realistic blood and eyeballs can scare them off the food.
- Use parchment on baking sheets so cheesy pizza bagels and chocolate popcorn lift off easily and do not glue themselves to the pan.
- Involve kids in safe steps like decorating faces and sprinkling toppings, and keep knives and hot trays out of their reach.
How to Make Halloween Snacks for Kids Parties
Step 1: Prep Your Workspace
Clear some counter space and set out all ingredients and equipment. Line baking sheets with parchment and plug in your microwave or set your oven to 375°F for hot snacks. Wash and dry fruits and veggies so you start with clean, dry produce.
Step 2: Make Mummy Hot Dogs
Unroll crescent dough and cut it into thin strips with a knife or pizza cutter. Wrap each hot dog with dough strips, leaving a small gap near the top for the “face.” Place wrapped hot dogs on a lined baking sheet and bake at 375°F for 10 to 14 minutes until the dough turns golden.
Remove from the oven and let them cool slightly. Use a toothpick to dot mustard or ketchup eyes in the face gap. Arrange on a platter and cover loosely with foil if you hold them for a bit before serving.
Step 3: Assemble Monster Apple Bites
Slice apples into thick wedges and toss them briefly in water with a splash of lemon juice, then pat them dry. Spread a layer of peanut butter or seed butter on one slice, then press another slice on top to form a “mouth” with a gap. Slide a strawberry slice or strip of red apple peel into the gap as a tongue.
Press mini marshmallows along the top edge as teeth. Add candy eyes or mini chocolate chips above the mouth with a tiny dab of nut butter as glue. Chill them in the fridge so the teeth stay in place.
Step 4: Make Ghost Banana Pops
Cut bananas in half and gently insert lollipop sticks into the cut end of each piece. Melt white chocolate chips or candy melts with a small spoonful of coconut oil in the microwave, stirring every 20 to 30 seconds until smooth. Dip each banana into the melted coating or spoon it over, then place on a parchment lined tray.
Press mini chocolate chips into the coating as eyes and a mouth while it still feels soft. Chill in the fridge until the coating firms up. Keep them cold until serving time so they hold their shape.
Step 5: Mix Spooky Popcorn
Pour popcorn into a large bowl and add pretzel sticks, chocolate candies, and candy corn. Melt white chocolate or colored candy melts and drizzle it over the mix while you toss gently with a spatula. Spread the coated popcorn on a parchment lined baking sheet.
Sprinkle Halloween sprinkles on top before the chocolate sets. Let it cool until the chocolate hardens, then break it into clusters. Transfer to a big bowl or portion into individual cups.
Step 6: Build Veggie Jack O’Lantern Cups
Draw jack o’lantern faces on clear cups with a food safe marker and let the ink dry. Spoon a couple of tablespoons of ranch, hummus, or dip into the bottom of each cup. Stand carrot sticks, cucumber sticks, and pepper strips upright in the dip so they look like a colorful bouquet.
Pack the veggies snugly so they do not tip over. Arrange cups on a tray and cover loosely with plastic wrap if you prep them ahead. Keep them chilled until party time.
Step 7: Bake Spider Web Pizza Bagels
Lay mini bagel halves on a lined baking sheet. Spoon pizza sauce on each half and spread it to the edges. Arrange mozzarella in thin lines that cross and connect to mimic a spider web.
Slice black olives and form tiny spiders by using one slice as the body and thin strips as legs. Place the tray in a 375°F oven and bake 8 to 10 minutes until cheese melts and edges crisp slightly. Cool a few minutes so kids do not burn their mouths, then serve warm.
Step 8: Set Up the Snack Table
Group snacks by type, like a “spooky savory” section and a “sweet treats” section. Add simple labels so kids know what each snack is called, which adds to the fun. Keep napkins, small plates, and kid friendly tongs or spoons nearby so little hands stay mostly out of the serving bowls.
Variations I've Tried
Swap the hot dogs for mozzarella sticks and wrap them in crescent dough to make “mummy cheese sticks,” then serve with warm marinara. Use green grapes on skewers with candy eyes for “caterpillar critters” if your group loves fruit more than candy. Turn popcorn mix into “witches’ cauldron crunch” by adding cereal squares and tiny pretzel bats.
Use tortillas cut into shapes with cookie cutters, then bake them into crispy chips and serve with salsa labeled “lava dip.” Turn banana ghosts into “pumpkin patch pops” by dipping them in orange tinted white chocolate and drawing jack o’lantern faces. If you host a morning party, make pumpkin shaped pancakes with chocolate chip faces and serve them with maple syrup and fruit.
How to Serve Halloween Snacks for Kids Parties
Serve Halloween Snacks for Kids Parties buffet style so kids see all the options and pick what they like. Keep hot items like mummy hot dogs and pizza bagels on warm trays or in covered dishes, and place cold snacks like fruit and veggie cups on a separate side of the table. Offer water, flavored seltzer, and juice boxes so kids stay hydrated without a sugar overload.
Add small themed touches like plastic spiders, napkins with pumpkins, and labels with silly names such as “monster mouths” or “ghostly bites.” Keep serving sizes small so kids try a few different things without wasting food.
How to store
- Store leftover mummy hot dogs and pizza bagels in airtight containers in the fridge for up to 3 days, and reheat them in the oven or toaster oven at 350°F until warm and slightly crisp.
- Keep popcorn mix in an airtight container at room temperature for 2 to 3 days, and stir it before serving again to redistribute any chocolate clusters.
- Refrigerate apple bites, banana pops, and veggie cups in covered containers for up to 1 to 2 days, and serve fruit snacks chilled for best texture.
- Skip freezing most of these snacks, since bananas, apples, and popcorn lose their texture after thawing, while hot dogs and bagels freeze better separately before baking if you want to prep far ahead.
Leave a Reply